How To
How to Use the ReelIQ Fishing App
A step-by-step walkthrough of every part of the app — from your first catch to the advanced features. Learn ReelIQ in about 10 minutes. Bookmark this page and come back as you explore.
Getting Started
ReelIQ has no sign-up, no email, no account. Download from the App Store, open it, and you're in. The whole app runs on your iPhone — your data never leaves your device.
- 1
Download from the App Store
Search “ReelIQ” on the App Store, tap Get, and open the app. No account creation step.
- 2
Allow Location & Camera
ReelIQ asks for camera (for fish photos) and location (to auto-fill GPS, weather, and water body). Both are optional but make logging instant.
- 3
Set up your profile
Settings → Profile. Pick the US state you fish in — ReelIQ pre-loads the top 10 game fish and water bodies for that region into your lists.
⭐ Tip
Setting up your profile first saves you from typing species and water body names later. Tap “Add to My Lists” when prompted and the catch screens get pre-filled.

Logging a Catch
ReelIQ supports three ways to log a fish so you can pick whichever is fastest in the moment — wet hands, gloves, or full sun glare.
- 1
Photo
Snap a photo or pick one from your library. The AI identifies the species, conditions auto-fill (weather, GPS, moon phase, water body), and you tap Save.
- 2
Manual
Skip the photo entirely. Pick the species from your list, type the length and weight if you want, save. Useful when you released the fish or didn't get a photo.
- 3
Quick Log
One-tap log with all your usual settings pre-filled (bait, technique, structure, water body). Set this up once in Settings → Quick Log Defaults.
⭐ Tip
Conditions auto-fill in the background while you frame the shot — there's no separate “fetch weather” step. Total time from photo to saved catch is usually 5–10 seconds.
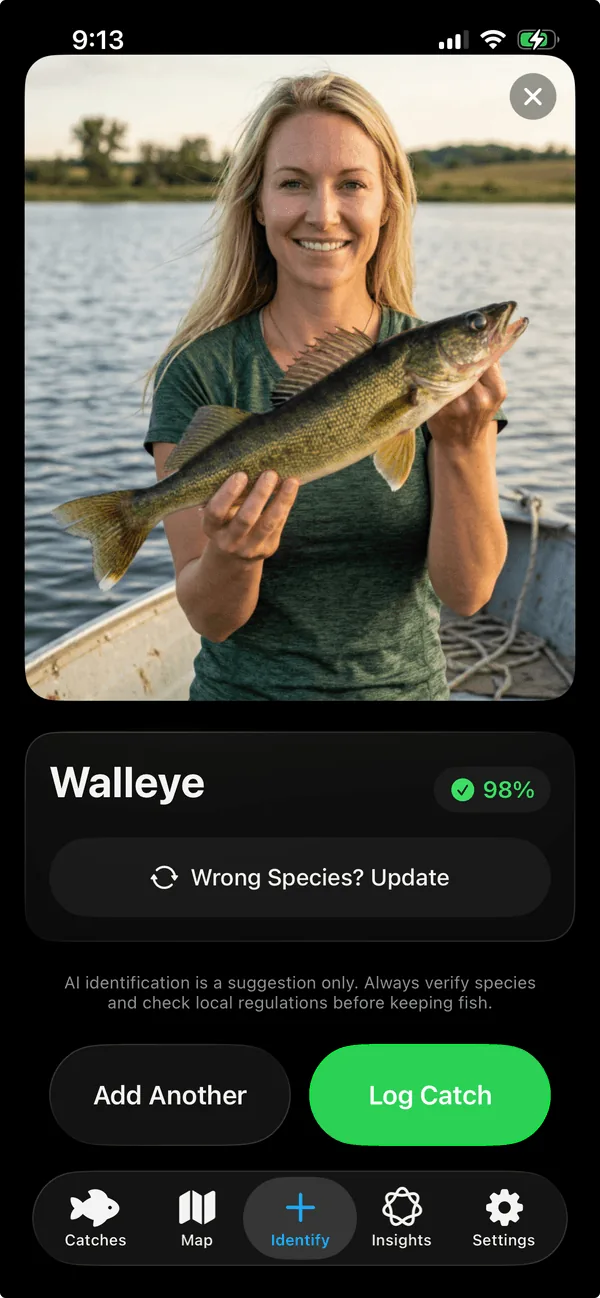
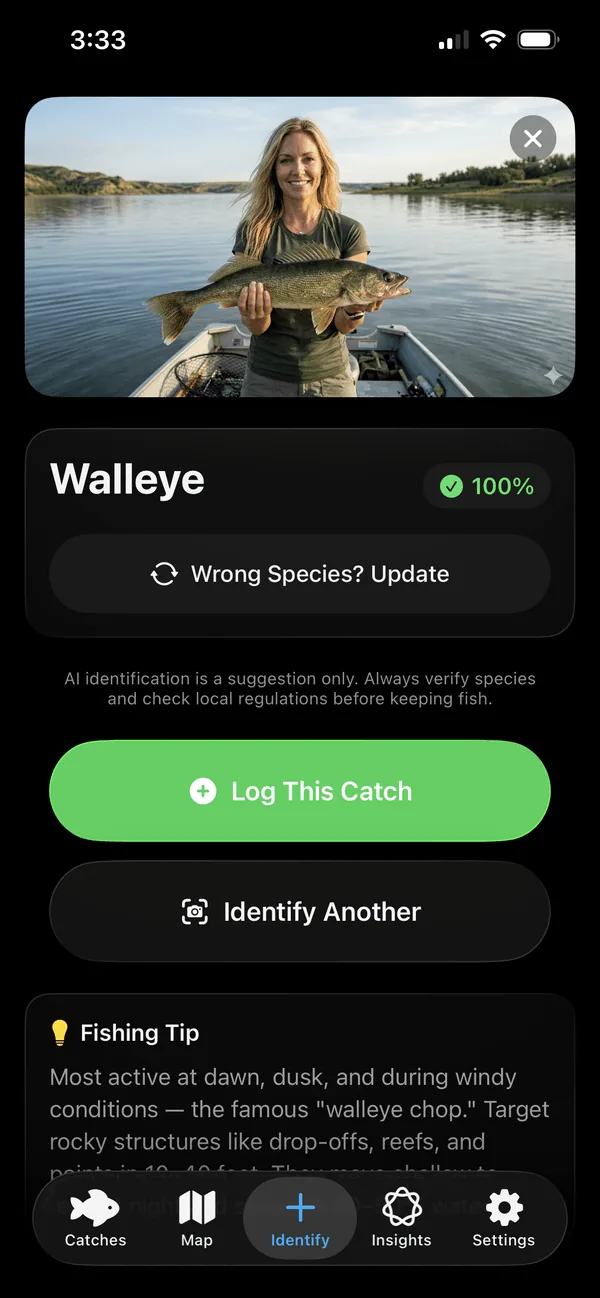
Identifying Species
ReelIQ's on-device AI recognizes 775+ species and runs entirely on your iPhone — no internet needed. Identification usually takes 1–2 seconds.
- 1
Take or pick a photo
Camera or photo library. Best results: good lighting, fish roughly centered, full body visible if possible.
- 2
Wait for the result
The AI shows the top match with a confidence percentage. Anything 90%+ is usually spot-on; lower scores mean it's a tougher angle or partial view.
- 3
Wrong species? Update
If the first guess is off, tap “Wrong Species? Update.” You'll see the AI's alternative top guesses, or you can search the full species list manually.
⭐ Tip
Identification is just a suggestion — always verify the species and check local regulations before keeping a fish.
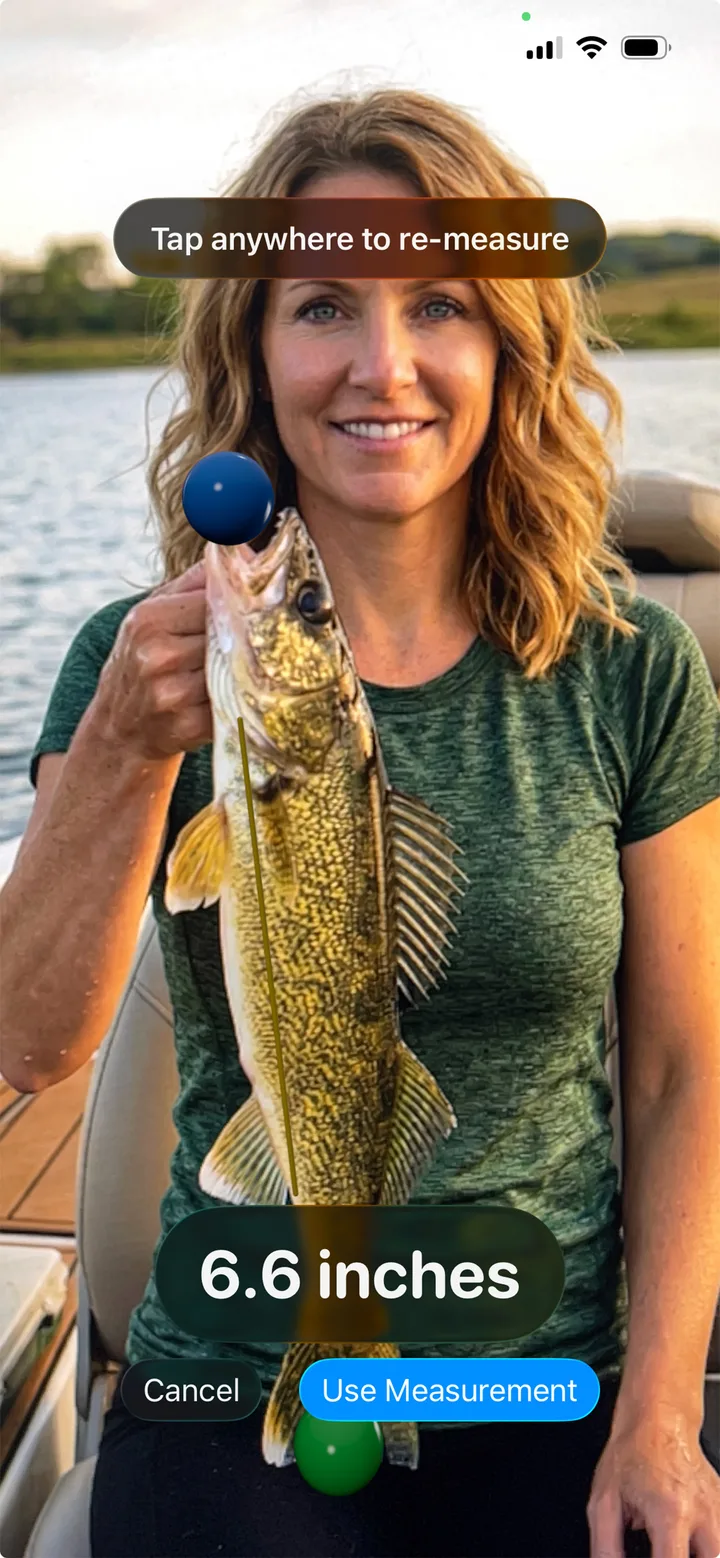
Measuring Fish
ReelIQ uses your iPhone's LiDAR/AR sensors to measure fish length without a tape. It's optional — you can always type the length in manually instead.
- 1
Open the AR ruler
On the Identify or catch entry screen, tap the AR length button. Your camera opens with measuring guides.
- 2
Tap the head
Aim at the fish and tap once on the head. A point pins to the spot.
- 3
Tap the tail
Tap once on the end of the tail. ReelIQ measures the distance and fills the length into your log automatically.
- 4
Or enter it manually
Tap the length field on the catch screen and type the inches/centimeters. ReelIQ remembers your unit preference.
⭐ Tip
AR length works best on a flat surface (deck, dock, ground). Hold the fish steady, get within a few feet, and tap the points firmly.
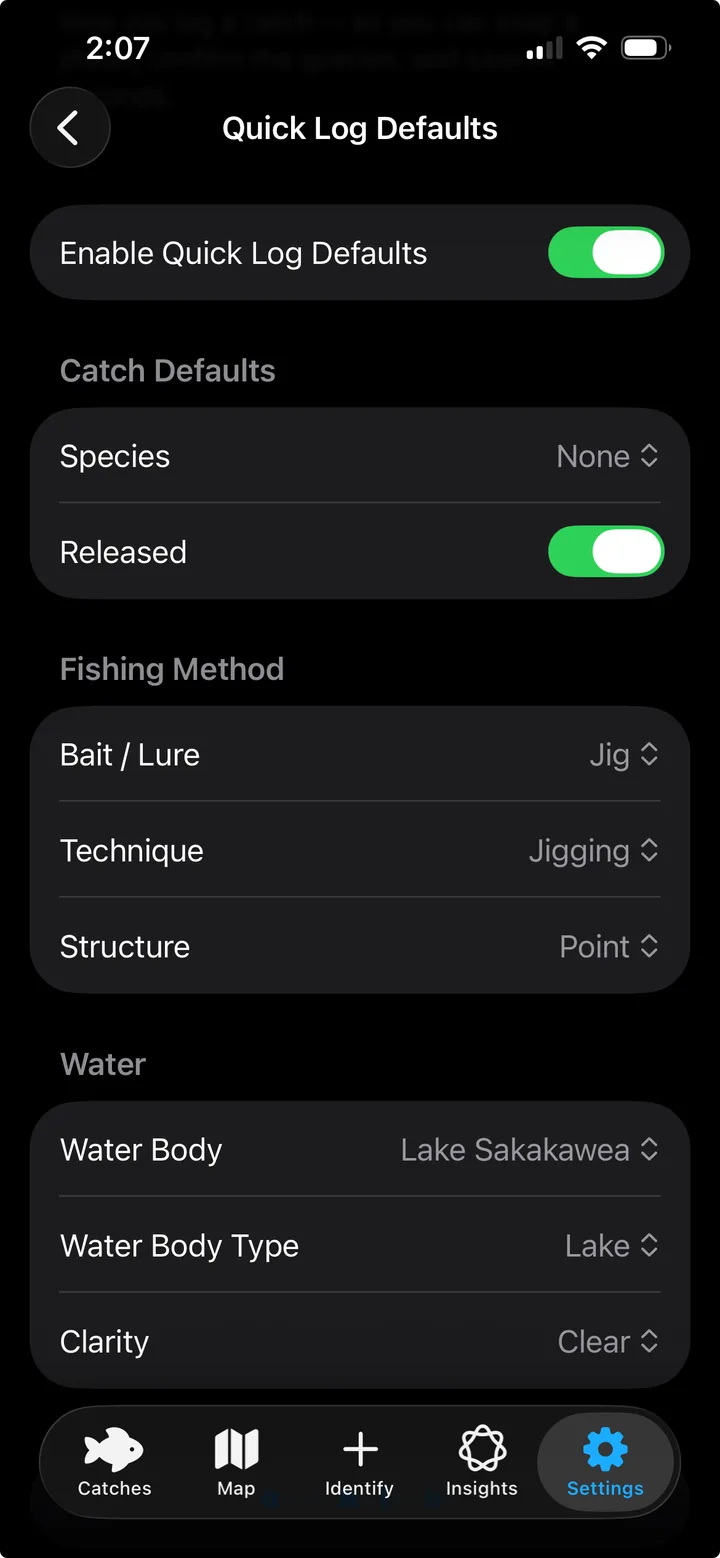
Quick Log
Quick Log is a one-tap shortcut that uses pre-set defaults so you don't have to fill in the same fields every catch. Best for tournaments and high-volume sessions.
- 1
Open Settings → Quick Log Defaults
Set your usual rig: species, bait, technique, structure, water body, depth — whatever you want pre-filled.
- 2
Save your defaults
Tap Save. Those values become the starting state for every Quick Log entry.
- 3
Log a catch with one tap
From the Identify or main screen, hit Quick Log. The catch saves with your defaults, GPS, and current conditions. Edit later if you need to.
⭐ Tip
Quick Log is ideal when you're catching a lot of the same species — bluegills off a dock, white bass on a run, walleye on a reef. Keep it as your speed-logging mode.
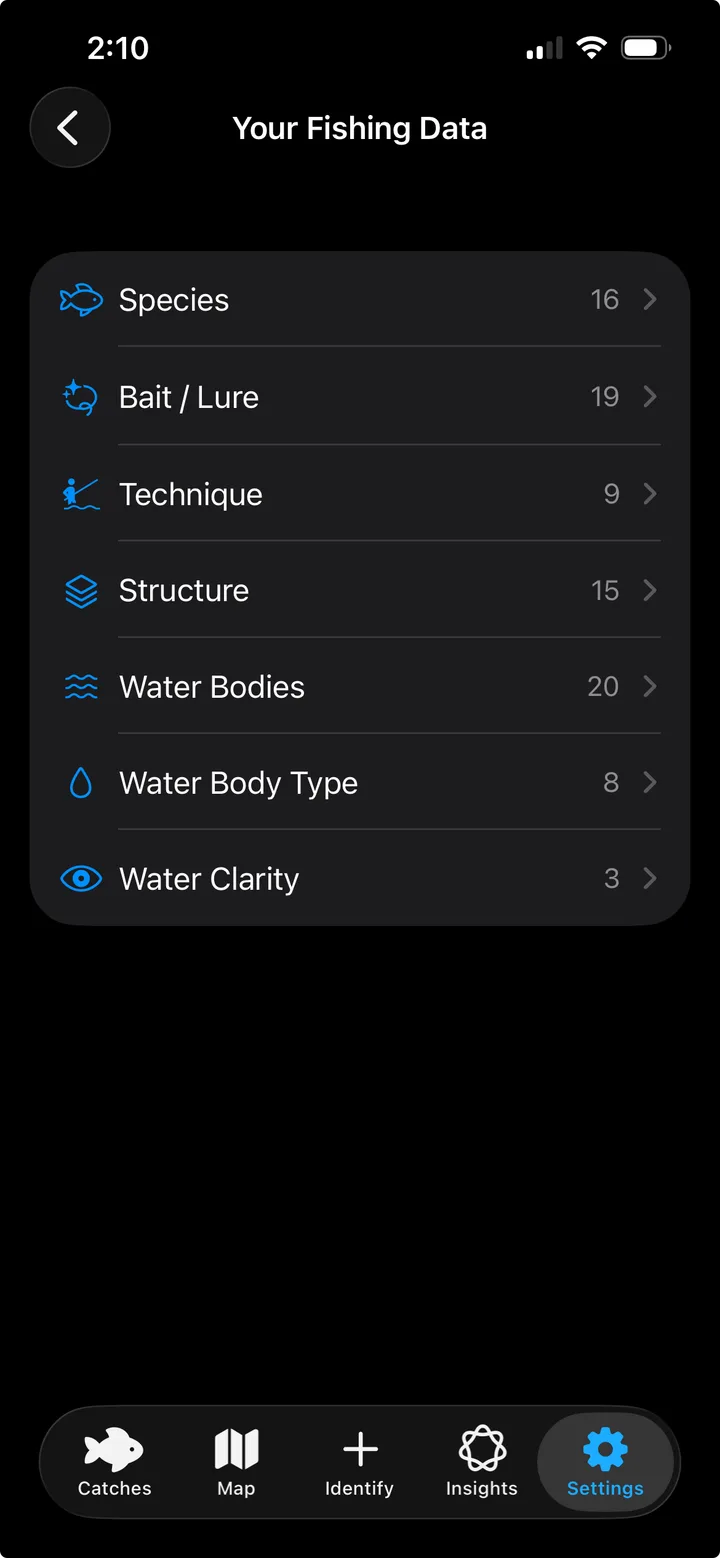
Profile & Fishing Data
Your profile tells ReelIQ which fish and waters matter to you. Setting it up properly makes every other screen faster — pre-filled lists, smarter suggestions, region-aware species defaults.
- 1
Pick your state
Settings → Profile → State. ReelIQ uses this to pre-load top game fish and major water bodies.
- 2
Add to My Lists
When prompted, tap “Add to My Lists.” The state's top 10 game species and most-fished waters get added to your custom lists in one tap.
- 3
Customize your lists
Settings → Fishing Data. Add or remove species, baits, techniques, structures, water bodies. Anything you fish regularly should live here for fast access.
- 4
Set your units
Settings → Display & Units. Choose imperial or metric, temperature units, weight format. ReelIQ uses these everywhere in the app.
⭐ Tip
If you fish multiple states, add the species and water bodies for each one — your lists can be as long as you want.
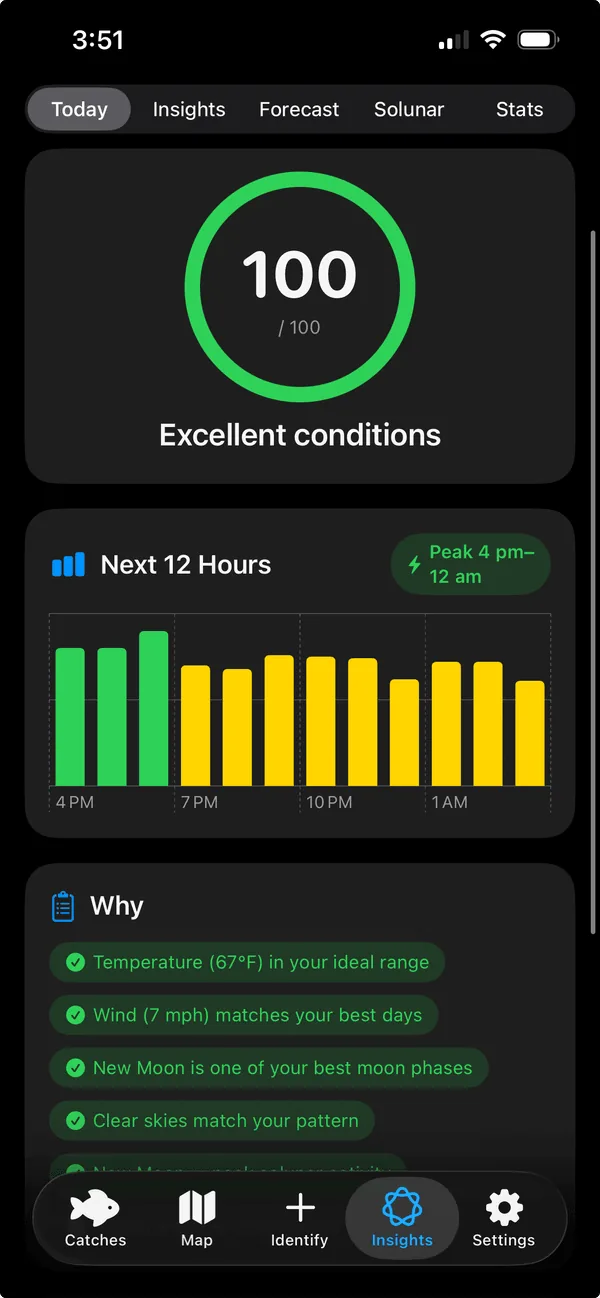
Insights & Forecast
Once you've logged a few catches, the Today tab and Insights screens turn your history into actionable predictions — when fish are biting, what's working, and what to expect over the next 7 days.
- 1
Today bite score
The Today tab shows a 0–100 score for current conditions, scored against your own catch history (not generic averages). Tap any species chip to see when that fish is biting today.
- 2
7-day forecast
Forecast tab. Each day gets a personalized score based on the upcoming weather and your patterns. Plan your trips around your best days.
- 3
Solunar calendar
Major and minor feeding windows by day. Combine with the bite score for the strongest take.
- 4
Insights
Insights tab shows your best time of day, best moon phases, best baits, and best techniques per species. Filter by date range, water body, or species.
⭐ Tip
The bite score gets sharper the more catches you log. After ~25 catches per species the patterns are usually solid.
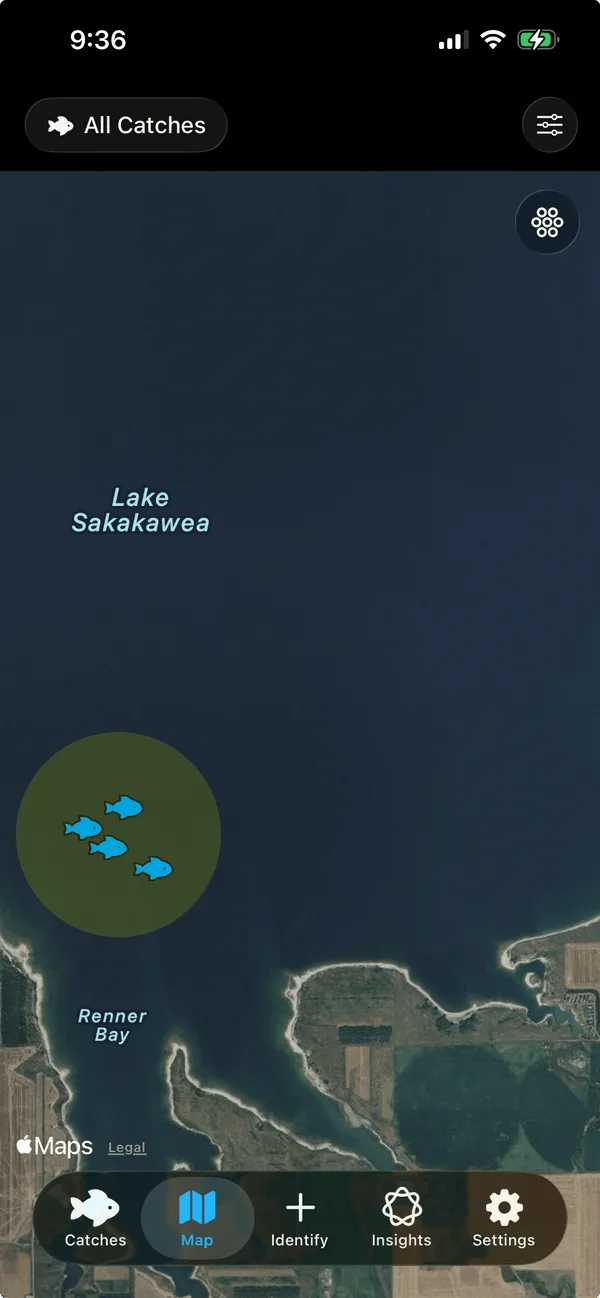
Map & Heatmap
Every catch you log is plotted on a private map. The heatmap layer shows where you're catching most — your spots, scored by your own success.
- 1
Open the Map tab
All your catches plotted as pins. Tap any pin to see the catch detail.
- 2
Toggle the heatmap
Tap the heatmap layer button. Hot zones show where you've caught the most — sized and colored by frequency.
- 3
Filter the map
Filter pins by species, date range, water body, or technique to see patterns within a specific subset of your catches.
⭐ Tip
Your map data never leaves your device. ReelIQ doesn't sync, doesn't upload, and doesn't share spots — your honey holes stay yours.
Home Screen Widgets
ReelIQ has Home Screen and Lock Screen widgets so you can see your fishing stats and last catch without opening the app. Pro feature.
- 1
Long-press your Home Screen
Long-press any empty area until apps wiggle, then tap the + in the top corner.
- 2
Search for ReelIQ
Type ReelIQ in the widget search. You'll see Season Stats and Last Catch widgets in multiple sizes.
- 3
Pick a size and add
Choose small, medium, or large. Drag it where you want and tap Done.
⭐ Tip
Widgets stay on your device — no internet needed. They refresh when you log a new catch.

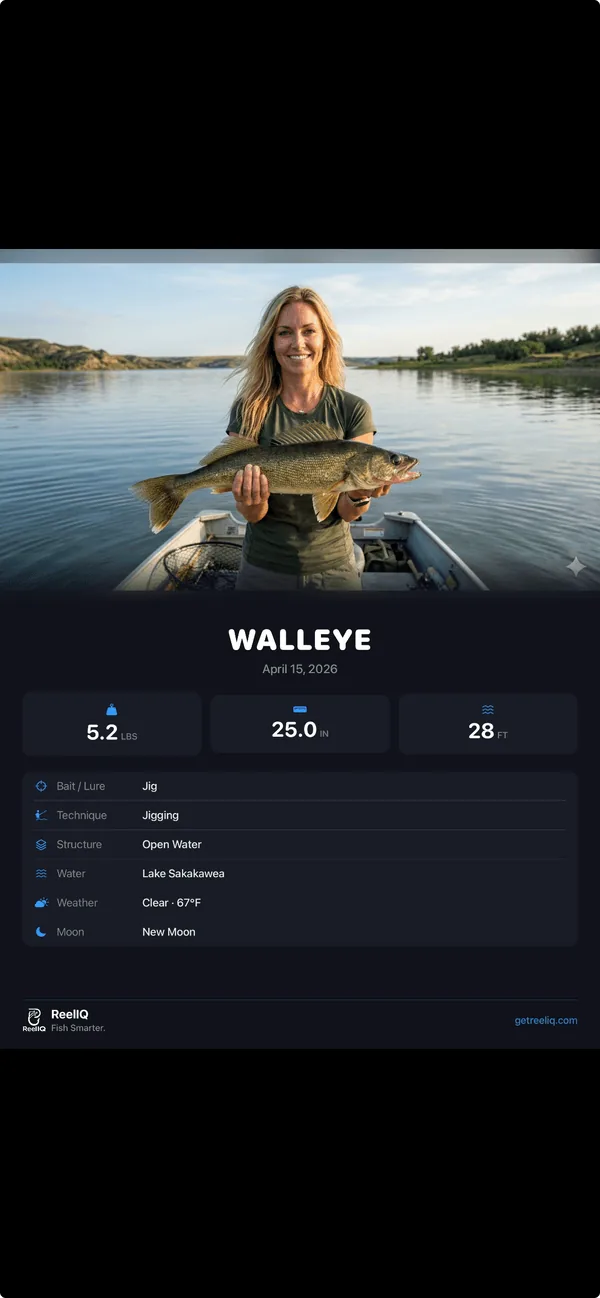
Sharing Catches
Share branded catch cards to anywhere — Messages, Instagram, Facebook, AirDrop. You choose what's shared. Nothing is automatic.
- 1
Open a catch detail
From the Catches tab or the Map, tap any catch to open its detail screen.
- 2
Tap Share
ReelIQ generates a branded share card with your photo, species, weight, length, and conditions baked in.
- 3
Pick where to send it
Use the iOS share sheet to send to Messages, Instagram, Facebook, Snapchat, AirDrop, email, or any installed app.
⭐ Tip
Share cards are images — they don't expose your GPS coordinates or any private data. The location shown is the water body name only.
Still stuck?
Drop us a line — we read every message and we're happy to walk you through anything that's not clicking.